Here is my complete, blind playthrough of Mystery Case Files: The Black Veil!
Showing posts with label HD. Show all posts
Showing posts with label HD. Show all posts
Monday, November 20, 2017

Tuesday, September 26, 2017
New Series - Archaica: The Path of Light
What can I say....the game looked cool! If you liked The Room and The Room Two, you will likely enjoy this game. It is more of a puzzler than a mystery based game, but the graphics are fantastic!
I've only completed the "tutorial" portion of the game and will gauge interest in the series before deciding how frequently to upload. It is also a stream candidate.
Check it out and let me know what you think!
Saturday, August 6, 2016
Wii Fit U Basic Run Island Lap All Routes Summer Night
So, since I've finally released all the videos on YouTube, I figured this was a great time to make a post archiving all of the Island Lap (personal favorite) routes set during a Summer Night. That's right, one of the lesser known features of Wii Fit U is that not only do the seasons change, but so does the time-of-day, and night time in the Summer makes for a very serene backdrop. So, enjoy the nostalgia and have fun on the runs!
You can check out these and other Wii Fit U videos here: Wii Fit U Playlist
Since you are still here, do you remember my very first, full playthrough of a game? If not, check out Wii Fit Plus: Wii Fit Plus Playlist
And, my personal favorite route is still Island Lap Route #2!
You can check out these and other Wii Fit U videos here: Wii Fit U Playlist
Since you are still here, do you remember my very first, full playthrough of a game? If not, check out Wii Fit Plus: Wii Fit Plus Playlist
And, my personal favorite route is still Island Lap Route #2!
Tuesday, May 26, 2015
Skylanders Research: Eon's Elite Gill Grunt Upgrade Paths and Attack Damage Numbers
Elite Gill Grunt Base Upgrades
Elite Gill Grunt Harpooner Upgrade Path
Elite Gill Grunt Water Weaver Upgrade Path
Elite Gill Grunt Attack Damage Numbers

Friday, May 22, 2015
Skylanders Research: Eon's Elite Eruptor Upgrade Paths and Attack Damage Numbers
Elite Eruptor Base Upgrades
Elite Eruptor Magmantor Upgrade Path
Elite Eruptor Volcanor Upgrade Path
Elite Eruptor Attack Damage Numbers

Tuesday, May 5, 2015
Skylanders Trap Team Research: Fling Kong Upgrades and Attack Damage
Fling Kong Base Upgrades
Fling Kong Disc Jockey Upgrade Path
Fling Kong Carpet Captain Upgrade Path
Fling Kong Attack Damage Numbers

Friday, May 30, 2014
Zoo Lou Upgrade Paths and Damage Numbers
Zoo Lou Base Upgrades
Legendary Zoo Lou Base Upgrades
Zoo Lou Attack Damage Numbers

Zoo Lou The Bucking Boar Upgrade Path
Zoo Lou The Wild Wolf Upgrade Path
Zoo Lou is a very unique character. He never physically attacks enemies himself, but rather relies on summoned animal friends to do the dirty work. You have Birds, Boars, and Wolves in the arsenal. The Birds are the primary attack, the Wolf is the secondary attack, and the Boar is the tertiary attack. The Base Upgrades address Birds and add the Boar along with one supporting upgrade. The Wolf is left completely out of the loop in the Base Upgrades.
Naturally, many would think, "Okay, the Wolf was left out, I should take Wild Wolf to balance things out." The Strategy Guide even boldly states, "The Wild Wolf Path edges it out (Bucking Boar Path) because Bird Call upgrades also help out against groups and you get extra food as a bonus." I have seen the strategy guide state the obvious and offer insights, but I can't recall seeing it blatantly tell you which path is better
And now that I have seen it...I disagree.
Wild Wolf is an okay path...in fact, it is probably a great path for those having trouble in challenges or tough portions of story mode. Alpha Wolf increases the attack damage and health of the wolf and Hunger of the Wolf gets him to attack a little quicker. That said, Hunter and Gatherer is the big payoff as this is where the Wolf will dig up food when your health is low.
I didn't get to check the health of the wolf, or have food dug up for me, but I feel I know enough. I can't argue that getting food at low health is of great value, but what about needing damage support instead of the food? My biggest disappointment is that there was never a 2nd Wolf. Now take a 2nd Wolf into the mix and you have one aiding in on immediate protection and the other digging up food and we have something going.
That said, I still would have to recommend Wild Wolf for beginners and players who need a character with good health attributes to get them through tough parts of the game, whatever those may be...Hunter and Gatherer will definitely be worth while for those endeavors.
The Bucking Boar turned out to be a big surprise. I'll say that just as not getting a second wolf disappointed me, the fact that the boar never got faster was also a disappointment. What wasn't a disappointment was going from 18 to 58 Armor. That +40 is a big deal to me and can be appreciated just as much by pretty much any Portal Master who realizes that increased armor on that scale can very well keep you from winding up at low health and needing food. Hog Wild really didn't do much for me, but Rough Rider did. This sounded lame and I was fully anticipating a few pebbles flying up and dealing some meager damage number like 5-8, or 10-15. The 30-45 is great! Plus, factor in that you are doing damage on the boar from the front via Raging Boar and then have the rocks out the back and you have a great ranged attack from what was once slow and very limited in range.
However, the biggest asset in my opinion is the fact that you get Rough Rider's rocks and Thicker Pigskin's Armor in conjunction with the simple observation that you can summon both the Wolf and Birds (even the Soul Gem Birds of Prey) WHILE riding on the boar! That is a big advantage in my opinion and definitely shifted the tables in favor of Bucking Boar.
Again, for rookies and players needing a Skylander capable of regenerative health, take Wild Wolf. Similarly, if you just really like the Wolf attacks, take Wild Wolf. For those on the fence, and the small few that might honestly prefer the Boar, go ahead and take The Bucking Boar Upgrade Path...I know you will not be disappointed!
Bumble Blast Upgrade Paths and Attack Damage Numbers
Bumble Blast Base Upgrades
Bumble Blast Attack Damage Numbers

Bumble Blast Bee Keeper Upgrade Path
Bumble Blast Honey Tree Path
Bumble Blast is a very solid character and I can see why so many say he is their favorite in the game. Granted, he is slow, but that is one of the negatives you can have on the guy.
The Bee Keeper Path is what I feel almost everyone will be initially drawn towards taking. From that segment, I wouldn't be surprised if 7 in 10 don't wind up taking it. While I don't think those that take it will be disappointed, I would personally go with Honey Tree.
Bee Keeper will offer up three bees at once (Bee Armada), increased damage from more bees (Stirred up a Nest), and an attack that deals anywhere from 32-62 (Queen Bee). I equate this path to a kind of Life Element rendition of Trigger Happy. I think most everyone will be content with this path...the only catch is to maximize damage you will want to make sure you have Honey Glob out and about.
The Honey Tree Path is nowhere near as flashy. It's biggest selling point to me was Honeycomb Bark for the +40 Armor (again, I am a sucker for Armor and Speed). That said, it turned out to deliver BIG TIME. Honey Buzz Blast lets you charge Honey Glob and unleash not only the glob of Honey, but pre-packed angry bees. Heavy Honey ups the damage and slows enemies, which is a very nice asset considering how slow Bumble Blast is. Couple the instant offense, slowed enemies, and increased Armor and I think you have the superior path.
For veteran players, I would encourage you to take Honey Tree. For rookie players, I think you would also benefit from Honey Tree, but if you really like the Beezooka, you would want to take Bee Keeper. The Bee Keeper isn't a bad path, it is just a more direct, blatantly offensive path.
I personally, with no hesitation, back Honey Tree. It delivers my armor, helps offset Bumble Blast's lack of speed by slowing enemies, and turns Honey Glob into a powerful attack that you can then use the base upgrade Beezook attacks with, or charge for instant bee-satisfaction. I ultimately feel it makes him a more well rounded character. The Bee-Pack Backpack is a big addition to either path, although some may object to it aesthetically...Despite it's less than desirable looks, it is worthwhile in my opinion due to the frequent, powerful attacks.
Wednesday, September 25, 2013
Brand New Skylanders SWAP Force Gameplay Footage
The epic overflow continues! While at work today I got an e-mail with brand new Skylanders SWAP Force Gameplay! The good folks that are Activision's PR sent over about 4 minutes of footage and some new screen shots!
The gameplay clip is awesome, super fast paced, and you can catch something you missed every time you watch it. That said, it had over 40 small, short clips in it...My initial plan was to break them down with title slides, introduce the clips, commentate them, and call it good. The short length of each individual clip made that tough, but I ultimately felt it would have taken away from the action and excitement. As deliver, you have 4 minutes of non-stop action that keeps you glued to the screen...I didn't want to take away from that, so I opted for something different:
I took screen caps from each of the 42 (by my count) scenes and spanned them for 10 seconds...This allowed me to highlight the character, scene, more, enemy, or item etc and prepare you for the frenzy that is the 4 minute highlight reel...I think it turned out pretty well given the options. This lets you take in the still shot from the clip, learn what to look for, and then see the action just like I saw it as a straight, continuous clip. With that said, let's take a look:
We've got tons of SWAP Force combinations on hand, some SF Newlanders, and an incredible amount of detail to take in...
That said, I did mention we had some Official Screen Shots as well...let's check them out:




.jpg)


.jpg)
.jpg)
.jpg)
.jpg)
+and+Stink+Loop+(Stink+Bomb_Hoot+Loop).jpg)

The gameplay clip is awesome, super fast paced, and you can catch something you missed every time you watch it. That said, it had over 40 small, short clips in it...My initial plan was to break them down with title slides, introduce the clips, commentate them, and call it good. The short length of each individual clip made that tough, but I ultimately felt it would have taken away from the action and excitement. As deliver, you have 4 minutes of non-stop action that keeps you glued to the screen...I didn't want to take away from that, so I opted for something different:
I took screen caps from each of the 42 (by my count) scenes and spanned them for 10 seconds...This allowed me to highlight the character, scene, more, enemy, or item etc and prepare you for the frenzy that is the 4 minute highlight reel...I think it turned out pretty well given the options. This lets you take in the still shot from the clip, learn what to look for, and then see the action just like I saw it as a straight, continuous clip. With that said, let's take a look:
We've got tons of SWAP Force combinations on hand, some SF Newlanders, and an incredible amount of detail to take in...
That said, I did mention we had some Official Screen Shots as well...let's check them out:

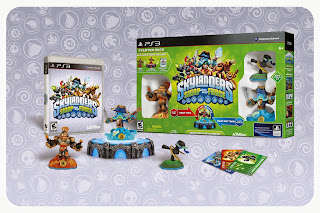
Skylanders SWAP Force Starter Packs: Final Renderings:


Nintendo 3DS Screen Shots
Grilla Drilla and Inventory

Grilla Bomb (Grilla Drilla + Stink Bomb)
.jpg)
Night Shift

Zoo Lou

Free Ranger's Vortex Move + Rattle Jet
.jpg)
Grilla Shift (Grilla Drilla + Night Shift)
.jpg)
Night Loop (Night Shift + Hoot Loop)
.jpg)
Stink Charge (Stink Bomb + Magna Charge)
.jpg)
Hoot Bomb (Hoot Loop + Stink Bomb) and Stink Loop (Stink Bomb + Hoot Loop)
in Survival Mode
+and+Stink+Loop+(Stink+Bomb_Hoot+Loop).jpg)
Roller Brawl and Zoo Lou in Survival Mode

Subscribe to:
Posts (Atom)